

In Dynamics 365, when you create a Lookup field, you select one table to relate to. For the Customer field type, you can’t choose the tables; by default, users can select from the Account and Contact tables.
We usually create multiple lookup fields to allow selection from multiple tables in a single lookup field and show the needed one based on a specific condition.
For many years, people working in Dynamics 365 and customers have wanted the ability to select a lookup field value from records in different tables.
Microsoft has introduced a new feature called Polymorphic Lookup Field or Multi-Table Lookup, which is still in Preview.
What is Polymorphic Lookup Field?
A Polymorphic Lookup Field is a lookup field that points to multiple tables, allowing users to switch between these tables to choose the needed record.
Currently, you can only create Polymorphic Lookup Fields through SDK or Web API. However, a new plugin called Polymorphic Lookup Manager has been released in XrmToolBox to easily create and manage these types of lookups.
In this post, we will go through the steps to create a Polymorphic Lookup Field using the Polymorphic Lookup Manager plugin.
- Open XrmToolBox, then install and execute the Polymorphic Lookup Manager plugin.

- Once the plugin is open, you need to select the following:
- Solution: The solution you are working on.
- Referencing Table: The table where you want to create the field.
- Attribute: Decide whether to create a new Polymorphic Lookup field or modify an existing one.
- Referenced Tables: A list of tables from which you can choose specific ones to include in the Polymorphic lookup.
- Lookup Display Name: The name of the Polymorphic Lookup field that will appear on the form.
- Lookup Schema Name: The schema name of the Polymorphic Lookup field.
- After selecting the options, click on Create Polymorphic Lookup to generate the new field.

- Once the field is created, you will receive a notification alert.
- The Polymorphic Lookup field is now available, and you can add it to the model-driven app form.
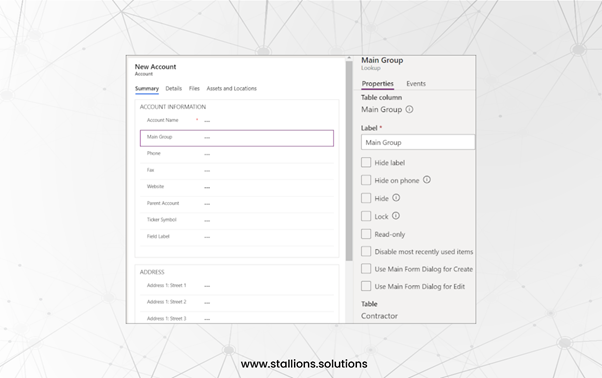
- Save and publish the changes to observe the Polymorphism in action and understand its functionality.
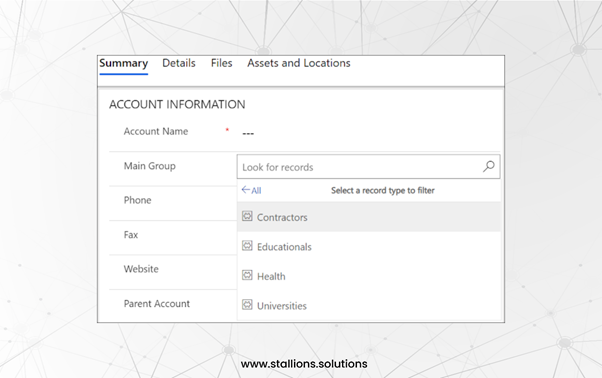
- Click on the “x types of records” link to view all the tables and their records.

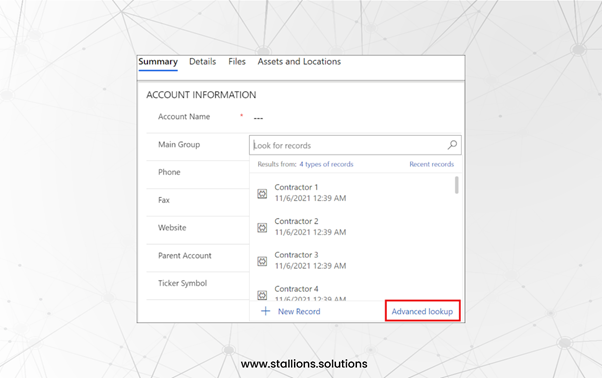
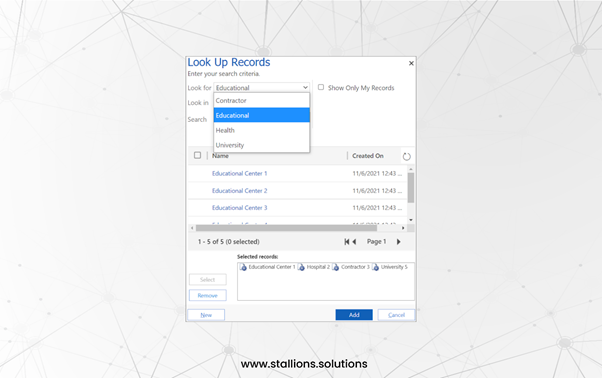
- Click on the Advanced Lookup link to open a pop-up displaying the list of tables and their records.

- What happens in the backend? New N:1 relationships are established from the Referencing table to each of the selected referenced tables.

Helpful Tips:
- In Advanced Find, you can select the polymorphic lookup field in the conditions, allowing you to choose different values from various tables to filter on. The results will be filtered accordingly.
- The Polymorphic Lookup field can be displayed in Views, and the corresponding record will open when the user clicks on it.

- To manage an existing Polymorphic Lookup field’s relationship, select the field in the Attribute option, make the necessary changes, and click the Apply Changes button.
- You can choose a table from the list of Referenced Tables to modify its relationship properties.
Hope this helps!